Search results for

takuan

Japanese, Pickles, Recipes, Side Dishes, Vegan, Vegetarian, Veggies

Homemade Takuan

May 4, 2014

Takuan BowlMy friend Tomoe always has a treat to give me when I stop by now and then to deliver tomatoes or avocados from our garden.  I never leave her home without a gift of her delicious mango bread, lilikoi jelly or in this case takuan.  I have never thought of making takuan since I only eat it occasionally and it’s readily available in the markets here.  After taking a jar of Tomoe’s homemade takuan home and tasting it, I decided it was about time to make my own.  Her little yellow pickles were so tasty, crunchy, sweet and salty with just a hint of tartness (much superior to the commercial brands)  and, oh so delicious with a bowl of steaming hot rice.

Peeled DaikonDaikon are not the most attractive vegetable.  In fact, with their pale color and gangly shape, they are quite homely.  However once you add a bit of seasoning to daikon, they transform into some of the best pickles you can imagine.  A case in point is Vietnamese pickles (Do Chua).  I adore these pickles piled high in a banh mi. Takuan pickles are delicious served as a side dish with rice and grilled fish, chicken or even tofu.  In fact I enjoy just a bowl of hot rice and takuan.

Sliced Daikon

Daikon WaterAfter mixing the daikon with sugar, let it sit for an hour or two.  You’ll end up with quite a bit of liquid in the bowl.

Japanese ColoringThough these pale radishes don’t need to be tinted a bright yellow, their color is actually part of their identity and what we grew up with.  Tomoe goes to Japan every year and buys powdered coloring.  I have no idea what the box says but it worked.

Yellow Food Color

Hawaiian Salt

Takuan with ColorIt takes about a week for the daikon to absorb the pretty yellow color and flavor of the brine.  After 2 weeks the pickles are ready to eat.

Musubi 2
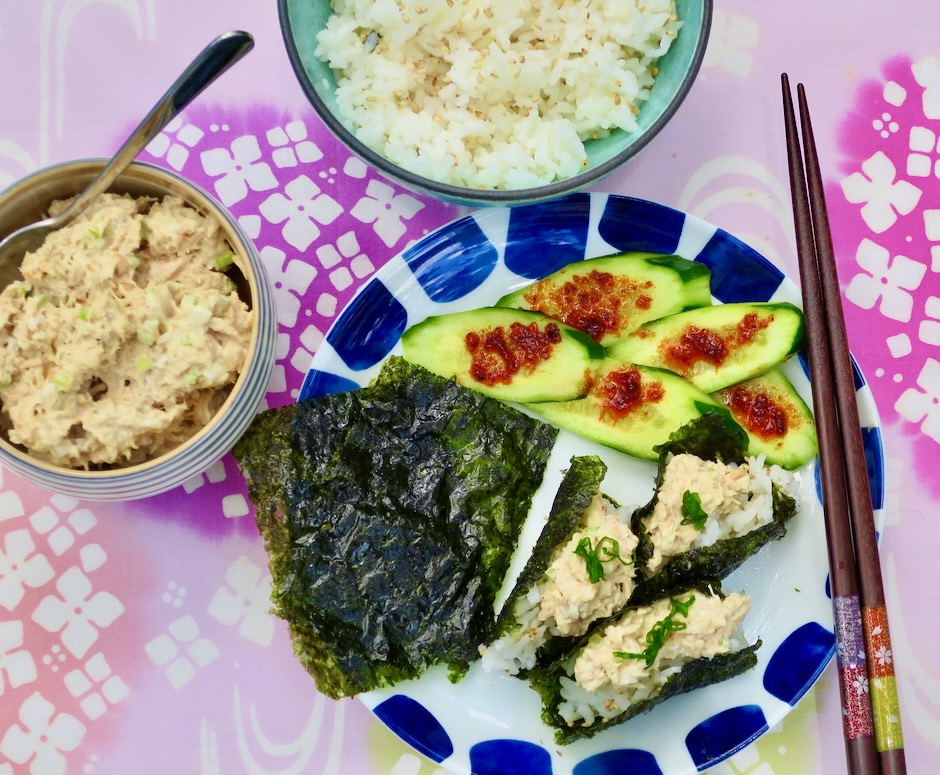
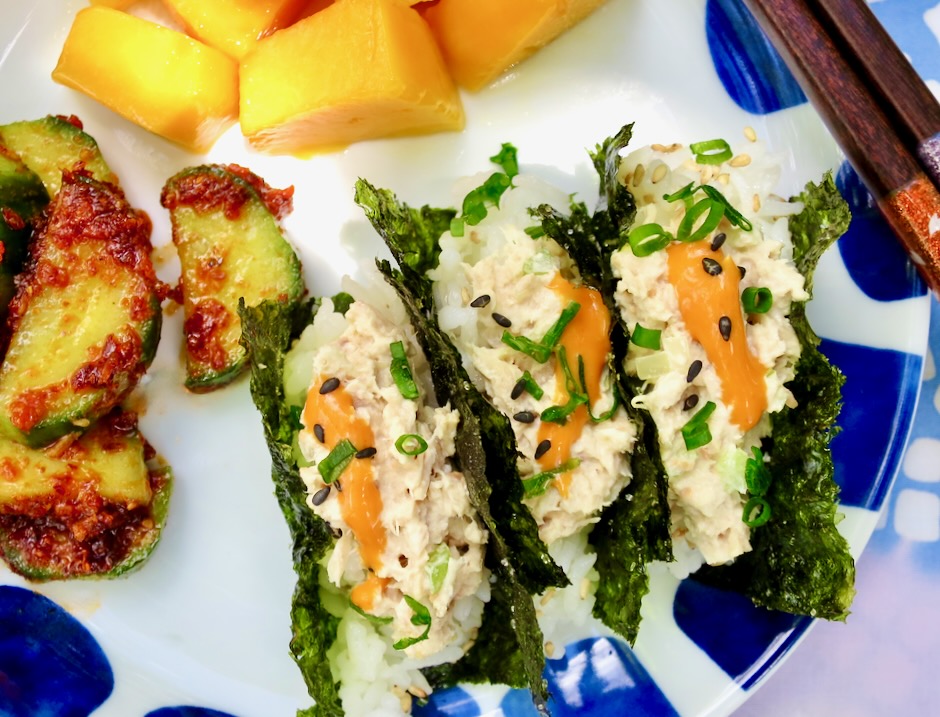
Onigiri goes hand in hand with takuan pickles!

Takuan and Musubi

Homemade Takuan

Adapted from Tomoe’s recipe

Makes 2 quart jars

Ingredients

3 1/2 pounds long daikon

2 cups + 1 tablespoon sugar

1/4 cup Hawaiian sea salt (kosher or other coarse salt if Hawaiian sea salt is not available)

1/4 cup + 3 tablespoons rice vinegar

yellow food coloring

Preparation

Peel daikon and cut into 2 inch length pieces about 1/3 inch thick.  Place in a large bowl and toss with sugar.  Let stand for 1 – 2 hours, tossing occasionally. Do not discard liquid.

Add Hawaiian salt and rice vinegar to the bowl of daikon.  Toss to coat well.  Add yellow food coloring being very careful not to add too much.  You can always add more if the color is not what you expected.  Cover bowl well, and refrigerate for 2 weeks, tossing pickles every few days.   The amount of liquid from the daikon will vary.  Taste and adjust seasoning as needed. Transfer pickles to quart jars and cover tightly.  Takuan pickles will last for months stored in the refrigerator.


Dinner, Fish, Japanese, Korean, Lactose Free, Recipes, Rice Dishes

Tuna, Rice & Nori Lunch

December 11, 2023

Tuna and rice wrapped in crispy and savory nori is one of my favorite combos to make for lunch. It doesn’t sound like anything special but once you try it you’ll understand why I love it so much. Think of it as an improvised hand roll. It couldn’t be simpler to whip up on short notice. When I was working, I would share it with a small group of friends at lunchtime. We all sat around the table and oohed and aahed as we ate our little tuna nori wraps.

Savory and tangy Kewpie mayonnaise replaces the usual Best Foods mayonnaise I use for tuna sandwiches. The velvety texture and rich flavor is perfect for this recipe.

With a plethora of canned tuna available these days it’s easy to find a good brand. Wild Planet does not have added water or broth which means it’s not going to be a mushy mess when you open the can.

A side of crispy cucumbers with chili crisp, kimchi or takuan and fresh fruit are the perfect pairing to complete your lunch. A drizzle of sriracha mayo over the tuna adds a nice kick to the nori wraps.

Tuna, Rice & Nori Lunch

Recipe by Kiyo
Servings

2

servings

Easy and delicious nori wraps are quick to prepare!

Ingredients

  • 1 rice cooker cup short or medium grain rice, cooked according to manufacturer’s instructions

  • 1 (5 ounce) can tuna in sea salt, such as Wild Planet)

  • Kewpie mayonnaise

  • 2-3 teaspoons finely chopped celery

  • 2 teaspoons finely chopped sweet onion

  • 2 teaspoons finely grated carrot

  • 2 teaspoons thinly sliced green onion

  • 1 teaspoon roasted sesame seeds

  • 1-2 packets Korean-style seaweed snacks, depending on size

Directions

  • Once rice has cooked, transfer to a bowl and gently mix in roasted sesame seeds. Cover with plastic wrap and set aside allowing rice to cool to room temperature.
  • In a medium bowl, flake the tuna with a fork. Mix in Kewpie mayonnaise (enough to moisten tuna generously, tuna should not look dry), celery, onion, and carrot. Transfer to a smaller bowl for serving.
  • Set out nori (just before serving to keep crisp), tuna salad, and rice. Make mini nori wraps by placing a small amount of rice on the nori, followed by tuna. Top with sriracha mayonnaise if using, and green onions. It’s best to make the nori wraps as you eat them so the nori stays crispy. Serve with your favorite side dishes such as potato salad, fresh fruit, kimchi and takuan pickles.
Cookies, Japanese, Lactose Free, Recipes, Vegan, Vegetarian

Furikake Animal Crackers

April 26, 2021

Furikake Animal Crackers

My friend Michelle’s mom, Tomoe, always has a treat for me when I stop by to deliver produce from our garden.  Like me, she is always busy making goodies to give away.  Pickled mango, takuan, and mango bread are just a few of the delightful treats she makes. On a recent visit, Tomoe gave me a container of furikake animal crackers.  I shared them with my co-workers and they all raved about how tasty they were.  So here’s another recipe from Tomoe, who by the way is in her 90’s and still having fun in the kitchen.

Animal Crackers

The original recipe calls for 2 pounds of animal crackers (Target sells giant tubs in the cookie aisle).  I cut the recipe in half and used 1 pound of crackers and made my own version (lactose free).

Furikake

There are many variations of furikake available. For this recipe, it’s best to use one that has simple ingredients such as sesame seeds and nori (seaweed).

Furikake

Animal Crackers & Glaze

These couldn’t be simpler to make.  Prepare the sauce, mix it up with the crackers, sprinkle with furikake, toss and bake.
Furikake Animal Crackers

These crackers bake low and slow for about an hour.  You will need to toss them every 15 minutes to ensure they crisp up evenly.  I found that after the 1 hour baking time was up, some of the animal crackers were stuck together.  Just split them apart with a thin spatula before you set them aside to cool.

Furikake Animal Crackers

Nicely glazed with bits of sesame seeds and nori on each cookie, these are a tasty treat.

Furikake Animal Crackers

Furikake Animal Crackers

Furikake Animal Crackers
 
Adapted from Tomoe's recipe
Author:
Serves: 1 pound
Ingredients
  • 1 pound animal crackers
  • ⅓ cup furikake
  • ½ stick (2 ounces) vegan Buttery Sticks (or regular butter)
  • 2 tablespoons + 2 teaspoons granulated sugar
  • 1 scant teaspoon kosher salt
  • 2 tablespoons + 2 teaspoons light corn syrup
  • 2 tablespoons + 2 teaspoons canola oil
Preparation
  1. Heat oven to 250 degrees. Line a rimmed half sheet pan (jelly roll pan) with heavy duty foil.
  2. Pile animal crackers on the foil lined baking sheet. Set aside.
  3. Melt Buttery Stick in a small saucepan over medium-low heat. Add sugar and salt and stir until dissolved. Remove from heat. Add corn syrup and oil. Whisk to combine. Pour syrup over animal crackers. Using disposable gloves, toss crackers with syrup until evenly coated. Sprinkle furikake over crackers and toss again. Bake for 1 hour, stirring every 15 minutes so the crackers bake evenly. Remove pan from oven to cool. If you notice any crackers stuck to one another, split them before they cool completely. The syrup will harden as the crackers cool. Store crackers in tightly sealed containers. I keep mine in the refrigerator.


Appetizers, Dinner, Fish, Japanese, Lactose Free, Recipes

Tuna Tartare with Avocado & Radish

June 17, 2016

Tuna Tartare with Avocado & Radish

Over the years, we have enjoyed many different versions of tuna tartare.  The best have been at favorite restaurants (those from Plouf in San Francisco and BLT in Honolulu come to mind).  However, with this recipe, we are making a version at home which rivals or even surpasses our previous favorites.  It’s hard not to love this tuna tartare.  There’s something about the rich and creamy avocado, silky fish, and delightful ponzu-like dressing.  It all goes together so very well.  And, it’s really the perfect summer meal for a warm day when cooking over the stove or turning on the oven just seems out of the question.  This dish relies on using the best quality sashimi grade tuna. Fresh, well chilled, and cut just this morning type-of-tuna from a reliable source is what you are looking for.  I can’t wait to make it again.

Sashimi Grade Ahi (yellowfin tuna)

Though I usually pay a dear price for the tuna at Whole Foods, I find the quality to be superb.  I always ask the staff at the counter whether the fish was cut that morning.  If it has been sitting around for more than a day, I skip it, and try again the following week. I find it most satisfying when the fish is very well chilled before serving.  Keep the fish in the refrigerator until you are ready to plate and serve the tartare.

Radish

I didn’t eat radishes when I was a child, except for the long and slender daikon variety that is commonly used to make Japanese pickled takuan.  These days I enjoy these pretty red radishes in salads as well as in this ahi tartare preparation.  The secret is to slice them ever so thinly and soak them in an ice water bath for a half hour to really crisp them up.

Chili Oil

Tuna Tartare with Avocado & Radish + Taro Chips

Serve the tartare with taro chips as an appetizer or as an entrée with rice and a side of crispy vegetable tempura.

Tuna Tartare with Rice & Vegetable Tempura

Tuna Tartare with Avocado & Radish
 
A lovely appetizer for a warm summer evening. Adapted from Bon Appetit Magazine.
Author:
Serves: 4 as an appetizer
Ingredients
  • Dressing:
  • 2 teaspoons finely grated lime zest (from two small or one large lime)
  • 2 tablespoons fresh lime juice
  • 1 tablespoon granulated sugar
  • 2 tablespoons + 2 teaspoons soy sauce
  • 2 tablespoons Champagne vinegar or white wine vinegar
  • 1 tablespoon + 2 teaspoons finely grated peeled ginger
  • Tuna:
  • 10 ounces sashimi grade tuna, very finely diced and well chilled
  • 4 teaspoons olive oil, divided
  • 1 teaspoon minced seeded serrano chile
  • 1 teaspoon minced shallot
  • kosher salt
  • 1 large avocado, halved, pitted and finely diced
  • 2 radishes very thinly sliced, chilled in an ice water bath for 30 minutes
  • chili oil
Preparation
  1. Combine lime zest, lime juice, sugar, and 2 tablespoons water in a small saucepan. Bring to a boil (this will happen in no time at all). Transfer liquid to a small glass bowl, cover and let cool completely. Strain cooled liquid through a fine-mesh sieve into a small bowl. Whisk in soy sauce, vinegar, and ginger. The dressing can be made 2 days in advance. Cover and chill.
  2. Toss tuna with 2 teaspoons olive oil in a medium bowl. Add chile and shallot, season lightly with salt.
  3. Mix diced avocado with remaining 2 teaspoons olive oil in a medium bowl. Season with salt.
  4. To assemble the tuna tartare, you may use a round mold or gently shape the avocado with your hands as I do, onto a serving platter. Arrange tuna over the avocado keeping a circular shape. Spoon some of dressing over the tuna and around the avocado. Top with radish slices and more dressing. Drizzle with chili oil. Serve right away.


Dinner, Fish, Japanese, Lactose Free, Recipes

Furikake Seared Ahi Salad with Nobu Matsuhisa Style Dressing

August 29, 2015

Furikake Seared Ahi Salad with Nobu Matsuhisa Style Dressing
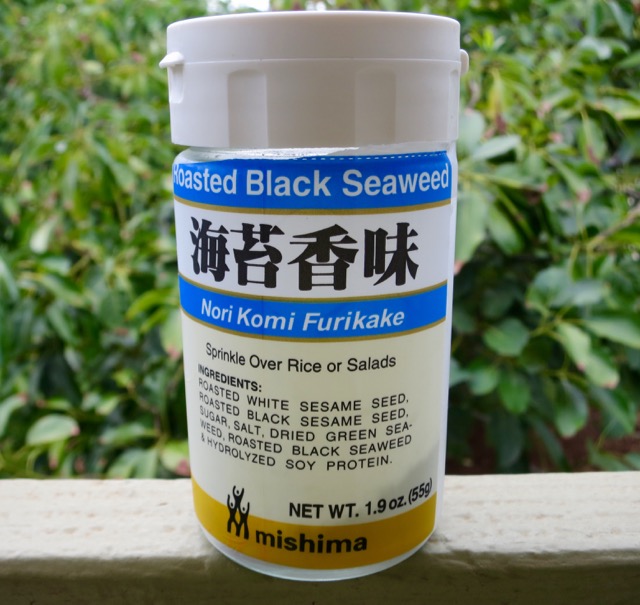
This is one of the simplest and most delicious ways to prepare fresh sashimi grade ahi.  The fish is coated with furikake, seared for just a few seconds on each side, and served with a flavorful dressing adapted from Nobu Matsuhisa’s original recipe.

Grapeseed OilGrapeseed oil has a clean light flavor.  It emulsifies well which makes it perfect for salad dressings and homemade mayonnaise.  If you don’t have grapeseed oil on hand, you may substitute it with canola oil.

Nobu Matsuhisa Style DressingMinced onion and a handful of other ingredients such as soy sauce and rice vinegar are mixed up in one bowl. That’s it!

furikake - 1 (1)There are many varieties of furikake.  Some are flavored with dried salmon or ume, others have shiso or bonito mixed in with the dried seaweed.  My favorite furikake is simply seaweed mixed with white and black roasted sesame seeds.  It’s the best choice for this seared ahi recipe.

Furikake Seared AhiI lucked out and found a beautiful ahi block for a decent price while shopping at Foodland in Kahului.  Other times I will splurge and buy fish at Whole Foods paying nearly twice the price.  But when I have a craving, nothing stops me from telling the fishmonger to wrap it up!

Furikake Seared AhiWe served the ahi over finely shredded greens with a side of Japanese rice and takuan.

Furikake Seared Ahi Salad with Nobu Matsuhisa Style Dressing

Furikake Seared Ahi Salad with Nobu Matsuhisa Style Dressing
 
Dressing adapted from Nobu Matsuhisa's recipe
Author:
Cuisine: Japanese
Serves: 2
Ingredients
  • Ahi:
  • 1 block sashimi grade ahi, about ¾ pound
  • grapeseed or canola oil
  • kosher salt
  • freshly ground black pepper
  • furikake
  • Salad:
  • 2 cups finely shredded salad greens, such as iceberg lettuce, carrots, cucumbers, red cabbage
  • Keep refrigerated until ready to use
  • Dressing: Makes ⅔ cup
  • ½ cup packed finely minced sweet onion, rinsed in a sieve and drained well on paper towels
  • 2 tablespoons + 2 teaspoons soy sauce
  • 2 tablespoons + 1 teaspoon rice vinegar (not seasoned)
  • ¾ teaspoon granulated sugar
  • 1 teaspoon powdered mustard, such as Coleman's, mixed with water to make a paste
  • few grinds of fresh pepper
  • 1 tablespoon + 1 teaspoon grape seed oil (or other mild flavored oil such as canola)
  • 1 tablespoon + 2 teaspoons sesame oil
Preparation
  1. Lightly coat the ahi with grapeseed or canola oil. Season the ahi with a little kosher salt and pepper. Sprinkle furikake on all four sides of the ahi, patting gently so furikake adheres to the fish.
  2. Heat a non-stick skillet over medium-high heat with a teaspoon of oil. Once hot, sear ahi on all four sides just until the coating is lightly browned, about 1 minute total.
  3. Set aside to cool, then slice into ⅓-inch pieces.
  4. In a medium bowl, combine soy sauce, rice vinegar and sugar. Stir until the sugar has dissolved. Mix in mustard paste and pepper. Add the minced onion and whisk in grapeseed and sesame oil.
  5. Place sliced ahi over salad greens. Drizzle some of the dressing over ahi and salad greens just before serving. Leftover dressing is delicious drizzled over a tofu salad.


Beef, Dinner, Korean, Lactose Free, Recipes

Best Beef Bulgogi

August 31, 2014

Best Grilled BulgogiKorean food is rapidly becoming one of America’s favorite ethnic cuisines and it is no surprise given its bold, spicy flavors.  Korean barbecue beef known as bulgogi is a particular favorite.  This bulgogi recipe is so good it will become habit-forming.  Grilling the beef instead of pan-frying it gives it that bit of barbecue flavor along with lovely grill marks.  My favorite way to serve bulgogi is with rice and a side of mac salad or green salad, kimchi and homemade takuan (plate lunch!) but it is equally delicious stuffed in a banh mi with a generous amount of do chua pickles.  It’s just beautiful.

Bulgogi MarinadeAfter a quick soak in this flavorful marinade you’ll have the best barbecued bulgogi.  Melt in your mouth super thin slices of lean, tender beef thrown on the grill is ready in just a few minutes.  The original recipes calls for flank steak but I much prefer to use the more tender filet mignon or top sirloin.  Thanks to TNCouch for sharing the recipe via allrecipes.com.

Bulgogi "Plate Lunch"

Bulgogi "Plate Lunch"

Best Beef Bulgogi

Adapted from allrecipes.com

Serves 4

Ingredients

1 pound filet mignon or top sirloin, slightly frozen for easier slicing, sliced very thin

5 tablespoons soy sauce

2 1/2 tablespoons white sugar

1/4 cup chopped green onions

2 tablespoons minced garlic

1 tablespoon roasted sesame seeds

2 tablespoons sesame oil

1/2 teaspoon ground black pepper

Preparation

Thinly slice partially frozen beef and place in a shallow bowl. Combine soy sauce, sugar, green onion, garlic, sesame seeds, sesame oil, and ground black pepper in a small bowl.  Pour over beef.  Cover and refrigerate for 1 hour, turning once halfway through marinating time.

Preheat an outdoor grill for high heat, and lightly oil the grate.

Quickly grill beef on hot grill until slightly charred and cooked through, 1 – 2 minutes per side.


Follow

Get every new post delivered to your Inbox

Join other followers: