Browsing Tag

Sesame oil

Japanese, Lactose Free, Pasta, Recipes, Salad, Vegan, Vegetarian

Ramen Salad

June 24, 2022

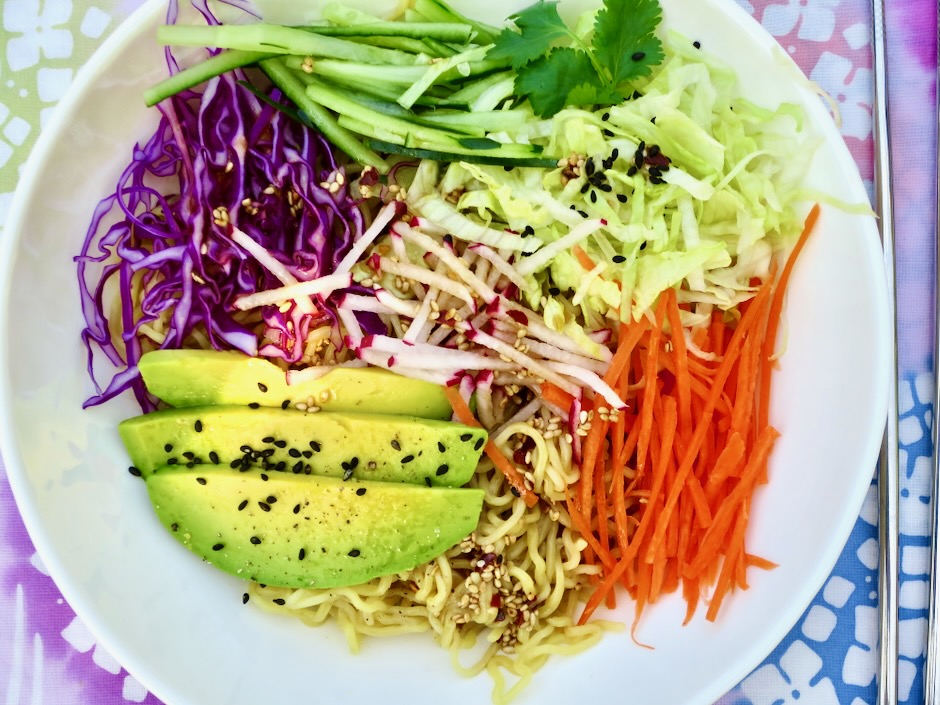
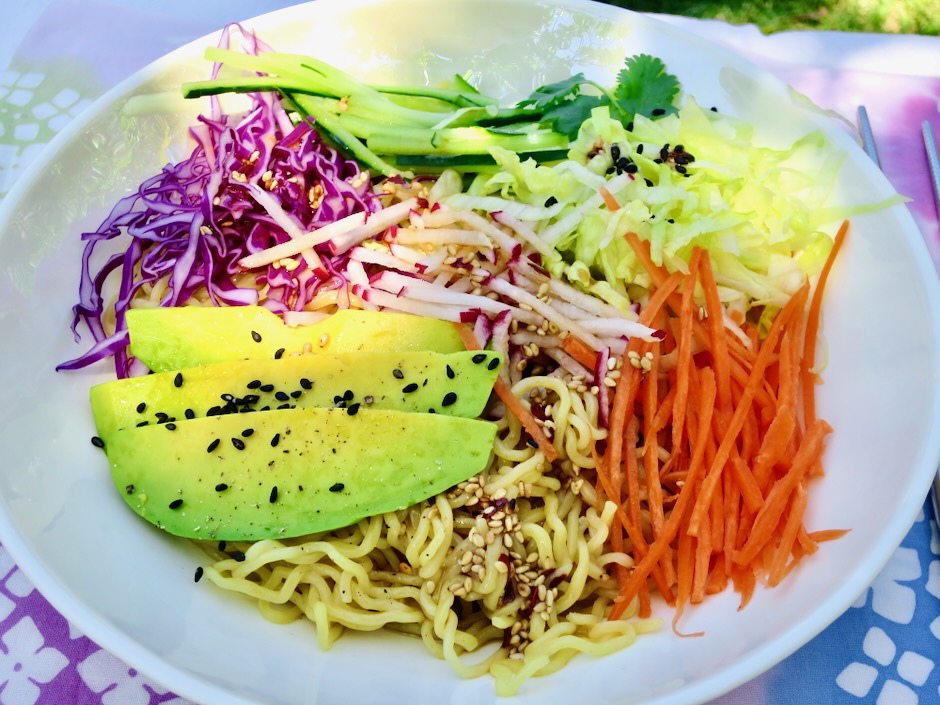
I can’t think of a more refreshing and satisfying combination than crisp vegetables served over ramen, drizzled with a tangy dressing. Although we usually think of ramen served in a steaming hot broth, it can also be used in cold or room temperature dishes like this one. The colorful vegetables are served on a bed of toothsome noodles that make for a delightful lunch.

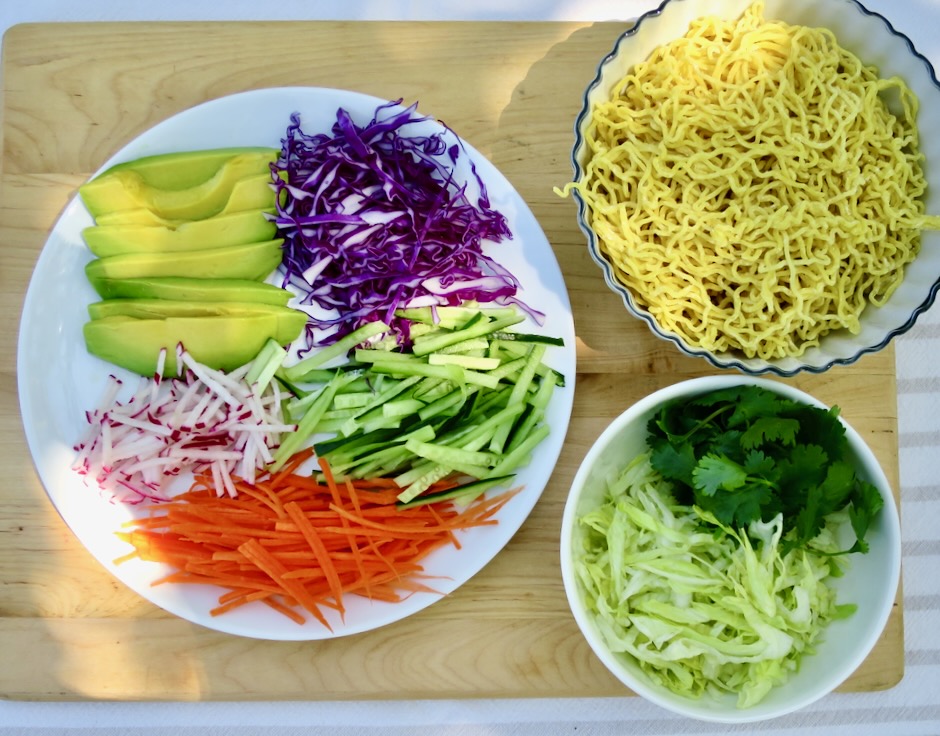
All the vegetables for this dish as well as the dressing can be prepared the night before you plan to serve it (except for the avocado). If you can’t find fresh ramen you may use dried noodles. I used fresh Sun Noodle ramen this time, however, Hakubaku brand dried ramen is a good choice if fresh is not available. If you prefer a wavy noodle, you might choose Ichiban dried ramen. Just be careful not to overcook the noodles so they retain their chewy texture. The noodles are best cooked just before serving.

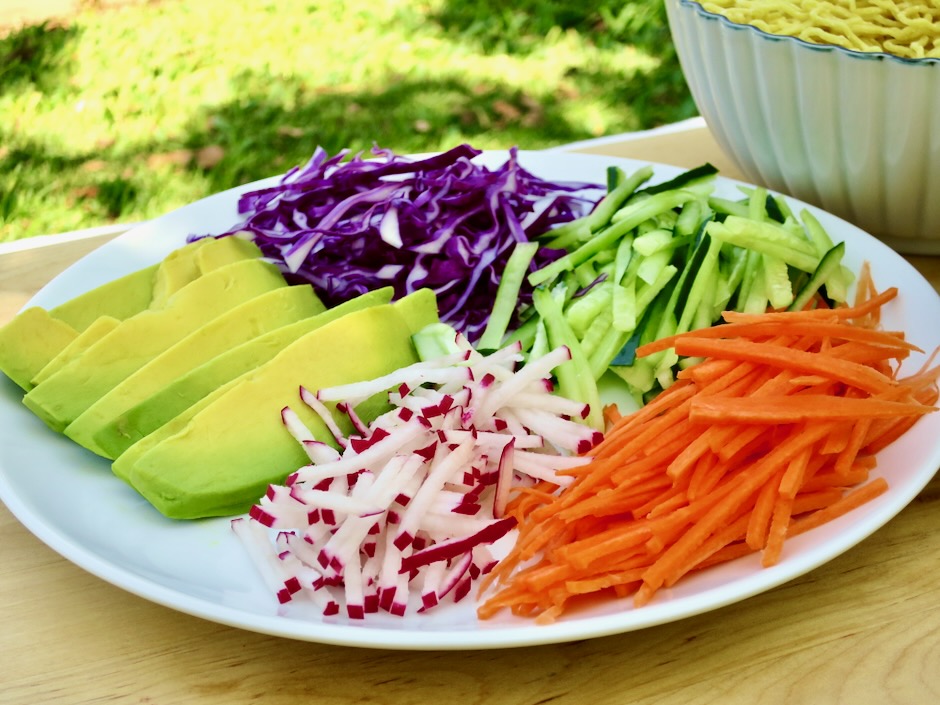
There are lots of options for the salad toppings. I used cabbage, cucumbers, carrots, radishes, and avocado. Other good choices would be watercress, summer squash, green onions. Make your dish colorful.

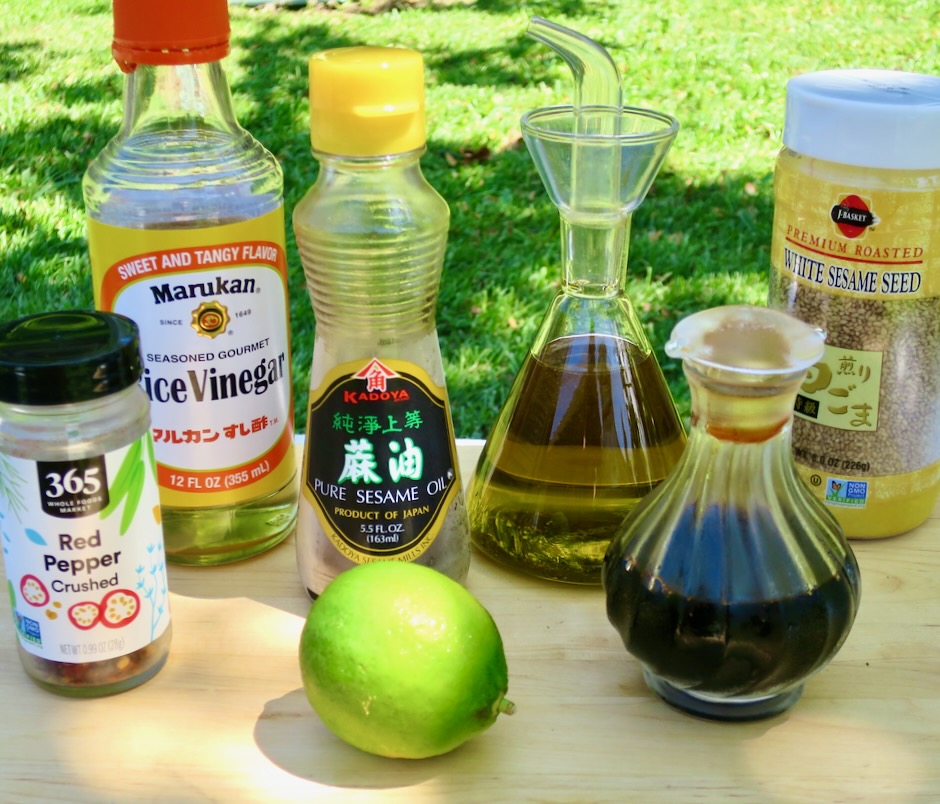
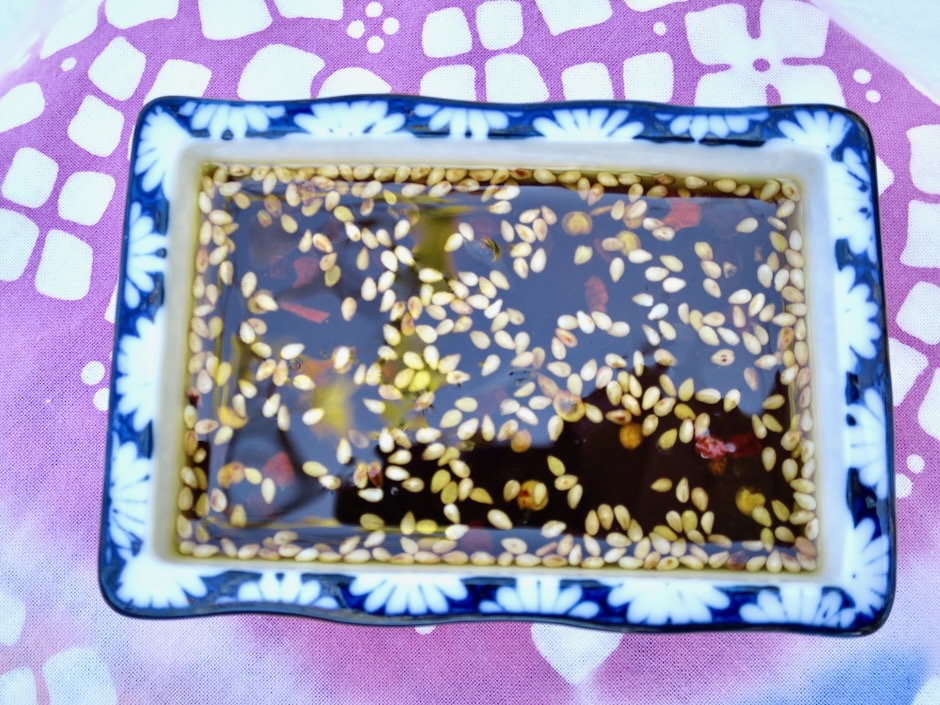
The dressing for this salad uses ingredients that are not difficult to find at your local market. The fresh lime juice makes this dressing pop!

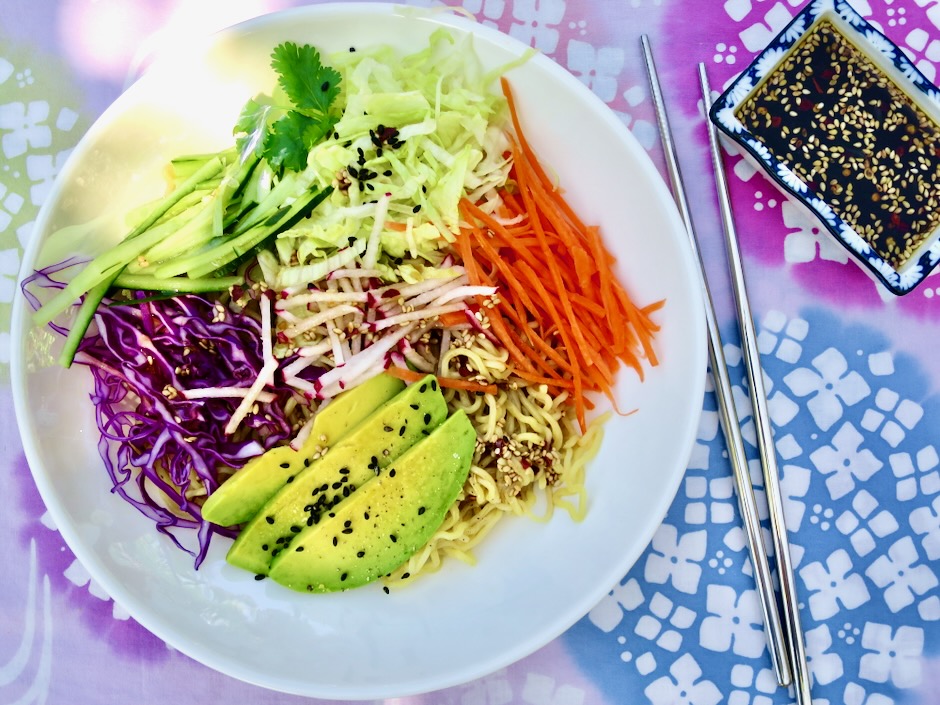
This is a one bowl meal that really hits the spot especially this time of the year when temperatures are soaring.

Ramen Salad

Recipe by Kiyo
Servings

2

servings

A refreshing ramen salad perfect for a summer meal

Ingredients

  • 1/4 cup seasoned rice vinegar

  • 2 tablespoons extra virgin olive oil

  • 1 1/2 tablespoons fresh lime juice

  • 2 tablespoons low sodium soy sauce

  • 1 tablespoon roasted sesame seeds

  • 1/2 teaspoon red pepper flakes

  • 1 teaspoon roasted sesame oil

  • 10 ounces fresh or 6 ounces dried ramen noodles

  • 2-3 cups shredded or julienned vegetables (radishes, iceberg lettuce, red cabbage, cucumber, summer squash, carrots, scallions, avocado

Directions

  • Combine seasoned rice vinegar through sesame oil in a jar. Shake and set aside.
  • Cook noodles according to package directions until just al dente. Immediately drain the noodles in a colander and rinse under cold water to stop the cooking. Transfer to a medium bowl, toss with half of the dressing.
  • Divide the noodles between bowls. Arrange vegetables over the ramen and serve with remaining dressing.
Dinner, Eggs, Japanese, Kimchi, Korean, Recipes, Vegetarian

Cheesy Kimchi Noodles

January 23, 2022

Cheesy Kimchi Noodles

Recently I started making homemade kimchi and have been in love with it ever since.  I’ve always enjoyed kimchi but the store-bought brands available here are not particularly exciting.  Homemade kimchi tastes so fresh and has the perfect spiciness level that I crave.  Kimchi is wonderful as a side dish that compliments many meals.  A regular bowl of rice, kimchi and a fried egg suits me just fine.  So this recipe from NY Times Cooking just hits the spot.  The surprise ingredient (grated cheddar) makes this dish “out of this world” delicious.  Add a sunny side up egg and you will have a truly satisfying meal.  Even though you may not make kimchi at home, a good kimchi with a nice level of spiciness will work well.

Homemade Kimchi

I love the gorgeous color and flavor of the Korean gochugaru pepper flakes.  It adds a subtle heat and a slightly smoky flavor to dishes and is the star of kimchi and other Korean dishes.Kimchi, Cheddar Cheese, Green Onions, Sesame Seeds, Ramen

This is a relatively simple recipe with very inexpensive ingredients (= the bomb!).  We use our homemade sriracha in the sauce but the popular Huy Fong sriracha will work well too.

Sautéing Kimchi, Green Onions, Garlic & Sesame Seeds

Kimchi, scallions, garlic and sesame seeds are quickly sautéed before adding the sauce and the cooked ramen.  

Ramen Added to Kimchi

Using dried instant ramen noodles is very appealing as they are readily available, shelf stable, and cheap.  For this recipe you will want cook the ramen for half the time instructed on the package.  This will ensure they are not overcooked for the final dish.

Grated Cheddar Added to Kimchi Noodles

Homemade Kimchi

Yum! Homemade kimchi will keep well in the refrigerator for months.  

Cheesy Kimchi Noodles

Cheesy Kimchi Noodles
 
Adapted from NY Times Cooking
Author:
Serves: 2
Ingredients
  • Noodles: 7 ounces dried instant noodles such as Sapporo Ichiban instant ramen (2 packets, 3.5 ounce each, discard seasoning packets)
  • 1½ tablespoons canola oil
  • 2 eggs
  • 5 green onions, thinly sliced on the diagonal (reserve 1 tablespoon for garnish)
  • ½ cup packed kimchi, sliced into thin strips or chopped
  • 1 large garlic clove, peeled and finely chopped
  • 1 tablespoon black or white roasted sesame seeds, plus more for serving
  • ½ cup finely grated cheddar cheese
  • Sauce: 1 tablespoon sriracha (more if you prefer extra spicy and if kimchi is not very spicy)
  • 2 tablespoons low sodium soy sauce
  • 1 tablespoon sesame oil
  • 1 tablespoon water
  • 1 tablespoon medium dry sherry or shaoxing wine
Preparation
  1. Bring a medium saucepan of water to a boil over high heat. Add the noodles and cook until tender but springy. I cooked the Sapporo Ichiban noodles for 1½ minutes instead of 3 minutes. Drain and rinse under cold water right away to stop the cooking. You may toss the noodles with a splash of canola oil to prevent sticking, or just give them a quick rinse to loosen the noodles before adding back to the pan.
  2. Meanwhile, prepare the sauce: In a small bowl whisk the sriracha, soy sauce, sesame oil, water and sherry or shaoxing wine. Set aside
  3. Set a medium nonstick skillet over medium-high heat. Add ½ tablespoon canola oil and, once shimmering, crack in the eggs. Reduce heat to medium or medium low and cook until the whites are done and the edges are browned, 2 to 3 minutes. You can cover the pan for 30 seconds or so to help the whites set but only for a short time or the yolks will become cloudy and loose their beautiful bright yellow color. Transfer eggs to a plate.
  4. In the same skillet, heat the remaining 1 tablespoon canola oil over medium heat. Add the green onions, kimchi, garlic and sesame seeds and cook for 1 minute stirring frequently. Turn heat up to medium-high and add the drained noodles and most of the sauce. Toss to combine using tongs, for 30 seconds (any longer and the noodles will become too soft). Add more sauce if needed. Stir in the grated cheese until it melts. This will take just a few seconds. Turn off heat. Transfer noodles to serving bowls, top with fried eggs (salt and pepper eggs) and garnish with reserved green onions and extra sesame seeds. Serve immediately.
Dinner, Eggs, Japanese, Lactose Free, Pasta, Recipes, Vegetarian

Life Changing Udon

July 10, 2021

Life-Changing Udon with Soft Boiled Egg and Fresno Pepper

In the May issue of Food & Wine magazine, Hetty McKinnon (cookbook and food writer) tells the story of her visit to Tokyo and how a simple bowl of udon became life-changing.  The noodles were toothsome, served with a perfectly cooked jammy egg, green onions and a bit of flavorful broth.  It was served with a generous amount of freshly ground black pepper scattered over the top which paired perfectly with the udon.  After reading the article, I was determined to prepare this noodle dish.  Now, more than a month has gone by and I’ve made it at least three times, and every bowl has been as delightful as the last.  

Life-Changing Udon with Soft Boiled Egg

Fresh Udon

Sun Noodle sells fresh udon at Island Grocery market in Kahului.  I will go out of my way to pick up a package of their excellent udon and ramen even if they are the only items I’ll buy that day.

Fresh Eggs

I just love eggs, especially ones with soft yolks.  The eggs I made for this dish are boiled for exactly six minutes and 50 seconds.  They are quickly transferred to an ice bath to stop the cooking.  You can use them as is, or make soy sauce eggs if you have extra time. Either way, the egg turns out perfectly with jammy centers and fully cooked whites.

Green Onions & Soy Sauce Eggs

It’s such a simple recipe with easy to find ingredients.  The baby bok choy adds color and crunch, but it is optional.  Don’t skip the green onions, egg, and pepper. Sometimes I will sprinkle shichimi togarashi pepper over the noodles to add a bit of spice to the dish.  This recipe does not have a lot of broth.  If you prefer more, increase that part of the recipe. However, I find that there is just enough to keep the udon hot, and the soup gets slurped up when the bowl is empty of noodles.  

Life-Changing Udon with Soft Boiled Eggs

Life Changing Udon
 
Adapted from Hetty McKinnon's recipe
Author:
Serves: 4
Ingredients
  • 4 large eggs
  • 2 cups vegetable stock
  • 3 tablespoons less sodium soy sauce
  • 2 teaspoons mirin
  • 1½ pounds (24 ounces) fresh udon noodles
  • 4 tablespoons Buttery Sticks, divided (or regular unsalted butter)
  • ½ cup finely sliced green onions, green and white tender stems
  • freshly ground black pepper
  • 1 tablespoon sesame oil
  • flaky sea salt for the eggs
  • shichimi togarashi Japanese pepper, optional
Preparation
  1. Fill a small saucepan with water; bring to a boil over high heat. Gently lower eggs into boiling water. Set timer for 6 minutes and 50 seconds. Once water returns to boiling, lower the heat slightly to maintain a gentle boil. Meanwhile, fill a medium bowl with ice water. Once the eggs have cooked, transfer to the ice water bath immediately. Let cool for a few minutes before peeling.
  2. Bring a large saucepan of water to a boil over high heat. Meanwhile, stir together the vegetable stock, soy sauce, and mirin in a small saucepan. Cook over low, stirring occasionally, until hot, about 6 minutes. Add noodles to boiling water and cook according to package directions for al dente. Drain noodles, and divide evenly among 4 bowls.
  3. Pour hot soy sauce broth over each bowl of noodles. Add a tablespoon of butter to each bowl and allow to melt into the noodles and broth. Halve the eggs and top each bowl with 2 egg halves. Sprinkle a bit of flaky sea salt and black pepper over the eggs. Add the green onions and scatter a generous amount of freshly ground black pepper over the noodles. Finish with a drizzle of sesame oil before serving. Serve with shichimi togarashi pepper (optional).


Beef, Dinner, Korean, Lactose Free, Recipes

Meat Jun

November 3, 2020

Meat Jun, Cucumber Salad, Rice, Korean Potatoes

I was only vaguely familiar with meat jun until my sister sent me a text with a photo of her “plate lunch” which featured this dish.  That piqued my interest enough for me to delve into the subject of this simple and homey dish.  I discovered that meat jun was introduced by a local Korean restaurant on Oahu many years ago.  It is a type of jeon, which refers to a Korean method of preparing seasoned meat or vegetables that are coated in flour and egg wash before being fried.  As is the case with many cross-cultural dishes in Hawaii, meat jun is a local island style invention.

Filet Mignon & Marinade

The meat for this recipe should be very thin so that it cooks quickly.  Many use top sirloin or ribeye.  I went to my local Safeway and asked the butcher if he would slice some filet mignon for me.  He asked me what I was going to make with it and when I told him, he said “that is going to be the best meat jun ever!”  As it turned out, filet mignon worked well because it’s so tender.

Marinating Meat Jun

Because the meat is sliced thin, it only needs to marinate in the sauce for 20 minutes before it is coated with flour, dipped in egg and pan-fried.

Meat Jun, Cucumber Salad, Rice, Korean Potatoes

Meat jun is delicious served with  rice and crunchy cucumbers or kimchi.  Leftovers hold up very well and need just a quick zap in the microwave to warm the meat up a bit.  The dipping sauce is excellent drizzled over the meat.  It has a good dose of vinegar which adds a nice zing to the soy marinated meat.  This unassuming dish is most addicting.

Meat Jun, Cucumber Salad, Rice, Korean Potatoes

Meat Jun
 
Author:
Serves: 2 - 4
Ingredients
  • For meat jun:
  • ½ pound thinly sliced filet mignon
  • ¼ cup less sodium soy sauce (Kikkoman recommended)
  • 1½ tablespoons sugar
  • 2 teaspoons sesame oil
  • 1 garlic clove, minced
  • 1 tablespoon thinly sliced green onion
  • 1 teaspoon roasted sesame seeds
  • ½ cup flour
  • 3 large eggs
  • canola oil for frying
  • For dipping sauce:
  • 2 tablespoons less sodium soy sauce
  • 1 tablespoon white vinegar
  • 2 teaspoons sugar
  • 2 teaspoons finely chopped green onion
  • ½ teaspoon roasted sesame seeds
  • ½ - 1 teaspoon gochugaru
Preparation
  1. Combine soy sauce through sesame seeds in a medium sized bowl. Add meat slices and marinate for 20 minutes (up to 30 minutes for thicker slices). Place marinated slices of meat on paper towels to drain slightly, just before you are ready to cook them (discard sauce).
  2. Meanwhile, combine dipping sauce ingredients in a small bowl. Mix well and set aside.
  3. Place flour in a wide shallow bowl, and whisk eggs in another wide shallow bowl. Heat ¼ cup of canola oil in a large skillet over medium heat (enough to generously coat the entire bottom of the pan). Use tongs to dip meat in the flour making sure to cover each piece well. Gently shake off any extra flour, then dip meat in whisked eggs making sure to coat well. Place on a piece of foil. Continue with all of the meat slices. Working in batches, fry meat until golden brown, about 45-60 seconds per side. Transfer to a paper towel lined plate. Continue cooking the rest of the meat. Slice meat into strips about 1-inch wide. Arrange meat on platter and serve with dipping sauce on the side.


Dinner, Japanese, Lactose Free, Recipes, Rice Dishes, Side Dishes, Vegan, Vegetarian

Brown Rice with Edamame

October 19, 2019

Brown Rice with Edamame

If I had to compile a list of my favorite foods, rice (and eggs) would be at the top.  This humble grain is simple to prepare, can be an accompaniment to a number of dishes including tempura or seared ahi, or it can be turned in to something show stopping like this dish.  Here is a healthy and flavorful rice dish that is a snap to make.  The edamame mix beautifully with the cooked brown rice and sesame seeds.

Frozen Edamame

Brown Rice

Brown rice can take a while to cook so plan ahead.  You can make this in the morning, cover and refrigerate then heat slightly before serving.  This dish is best served at room temperature.

Brown Rice with Edamame

This rice goes well with orange chicken, grilled teriyaki salmon, and all types of tofu dishes.  I can be thoroughly content eating this rice with a side of kimchi or Japanese pickles.

Brown Rice with Edamame

Brown Rice with Edamame
 
Adapted from Martha Stewart's recipe
Author:
Serves: 2 - 4
Ingredients
  • 1 cup medium grain brown rice, cooked according to package directions
  • 1 cup frozen shelled edamame
  • ½ teaspoon sugar
  • 1 tablespoon fresh lime juice
  • 1 tablespoon unseasoned rice vinegar
  • 1 teaspoon sesame oil
  • kosher salt
  • 2 scallions thinly sliced on the diagonal
  • black roasted sesame seeds
Preparation
  1. Cook rice in a rice cooker or on the stovetop according to package directions.
  2. Cook frozen edamame in a small pot of boiling water for 4-5 minutes. Drain well.
  3. In a small bowl, dissolve sugar in lime juice and rice vinegar. Add sesame oil and stir to combine. Set aside.
  4. Transfer rice to a medium bowl. Fluff rice with a fork. Sprinkle ¼ teaspoon of kosher salt and stir into the rice . Add edamame, dressing and sesame seeds. Stir well to combine the flavors, adding more salt to taste. Sprinkle scallions over the rice before serving.


Dinner, Fish, Japanese, Lactose Free, Recipes

Furikake Ahi with Soy Vinaigrette

March 25, 2019

Furikake Ahi with Soy Vinaigrette

Virtually no one reads the newsletters that often accompanies utility bills, but John does.  He suggested that I take a look at this one that came with the gas bill and featured a recipe from Diamond Head Grill & Market on Oahu.  Don’t cook with gas?  Your electric stove will do just fine.  I’ve made this on numerous occasions and never tire of it.  The most important ingredient is of course the fresh ahi.  A few years ago I discovered Oki’s Fish Market tucked in the corner of the Kahului Foodland market.  Oki’s always has fresh ahi blocks and ahi steaks at reasonable prices.  So when I’m in the neighborhood, I always stop by to pick up fresh fish.

Fresh Ahi Block

I usually buy a 10-12 ounce ahi block, enough to serve two people. Look for ahi with the least sinew lines (they make it difficult to cut the fish in neat slices).

Best Furikake

My favorite furikake is Mishima’s Nori Komi Furikake.  It’s a simple mix of roasted white and black sesame seeds and seaweed.  This is the best type for coating the ahi block.  Other furikake flavors may include dried salmon, shiso, wasabi and other ingredients.  These are delicious served over hot rice but I would avoid using them for this recipe.

Ahi Block Coated in Furikake

Once the fish is coated with furikake, it gets a quick sear on all sides in a hot pan.

Soy Vinaigrette

The vinegar, soy sauce, sugar and sesame oil makes a delicious vinaigrette.

Wasabi Sauce

I always have a bottle of this delicious wasabi sauce in my refrigerator.  It is excellent served with the furikake ahi. Once you try it, I’m sure you’ll agree that its “velvety zing” makes it a perfect condiment for fish.

Furikake Ahi with Soy Vinaigrette

The furikake ahi can be served as an appetizer however my favorite way to have it is with hot Japanese rice and steamed baby bok choy.

Furikake Ahi with Soy Vinaigrette


Furikake Ahi with Soy Vinaigrette
 
Adapted from Diamond Head Market & Grill
Author:
Serves: 2 servings
Ingredients
  • Fish:
  • 10-12 ounce block of fresh ahi
  • 3 tablespoons furikake such as Mishima Nori Komi Furikake
  • 1 teaspoon sesame oil
  • Sauce:
  • 1 tablespoon rice vinegar (unseasoned)
  • 1 tablespoon soy sauce
  • 2 teaspoons sugar
  • 1 tablespoon water
  • 1 teaspoon sesame oil
  • 1 teaspoon roasted sesame seeds
  • 1 teaspoon finely sliced green onions (to finish)
Preparation
  1. Crust ahi block with furikake. Coat a small frying pan with 1 teaspoon sesame oil and over medium to medium-high heat quickly sear the ahi to create a crust. I typically sear each side for about 1 minute, however the time will depend on how thick your piece of fish is, and how rare you prefer your fish. Remove fish to a cutting board.
  2. Whisk vinegar, soy sauce, sugar, water, sesame oil and sesame seeds together in a 1-cup glass measuring cup. Stir to combine and microwave for a few seconds until warm.
  3. Slice ahi and transfer to a plate. Drizzle warm vinaigrette over the fish. Sprinkle with green onions and serve with wasabi sauce (optional).


Follow

Get every new post delivered to your Inbox

Join other followers: