Browsing Category

Recipes

Breakfast, Cheese, Dinner, Eggs, Recipes, Sandwiches

Cheesy Eggs Kejriwal

February 29, 2024

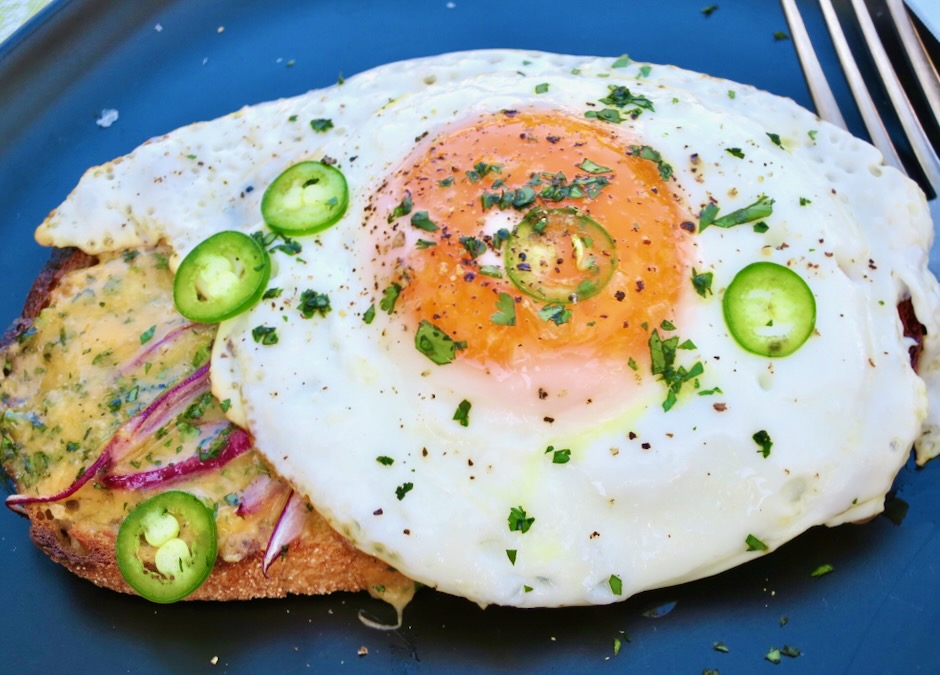
Named after the late Devi Prasad Kejriwal, this iconic egg dish was created in the 1960s at the Royal Willingdon Sports Club in Mumbai. As the legend goes, Mr. Kejriwal’s family did not consume eggs (they were vegetarians but he loved eggs) so he got his egg fix at the club. He asked the waiters to make him eggs on toast with melted cheese and green chiles. Soon, others at the club were asking the waiters to bring them what Kejriwal was having and the rest is history. In 2016 the New York Times called Eggs Kejriwal one of the best dishes of the year. And little wonder: It is so delicious.

There’s nothing fancy about this dish even though it originated at a prestigious sports club. Sometimes just a few humble ingredients can be turned into something truly delightful.

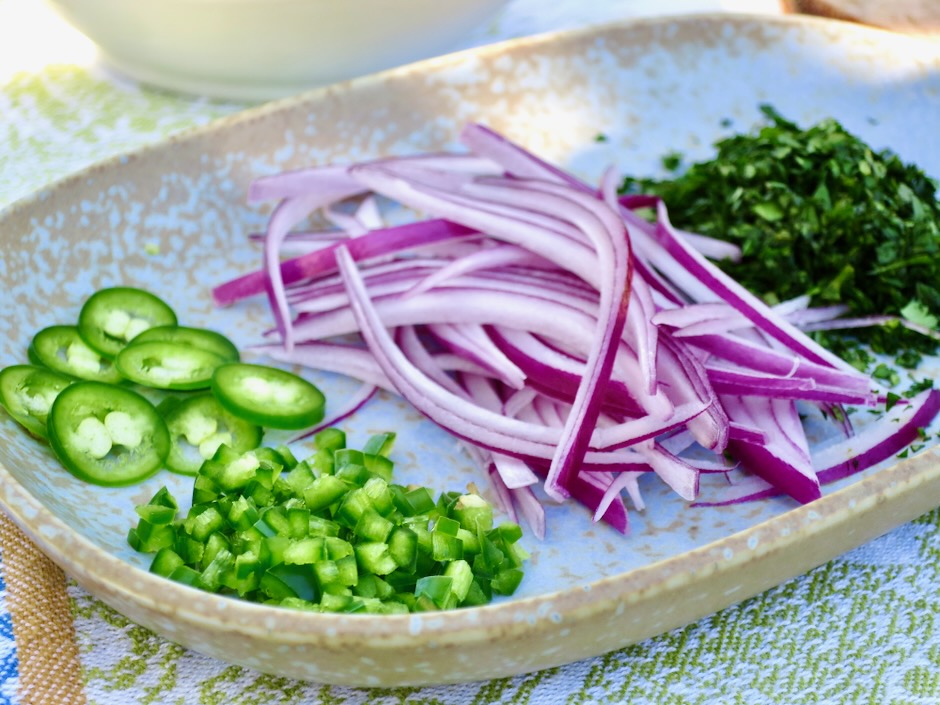
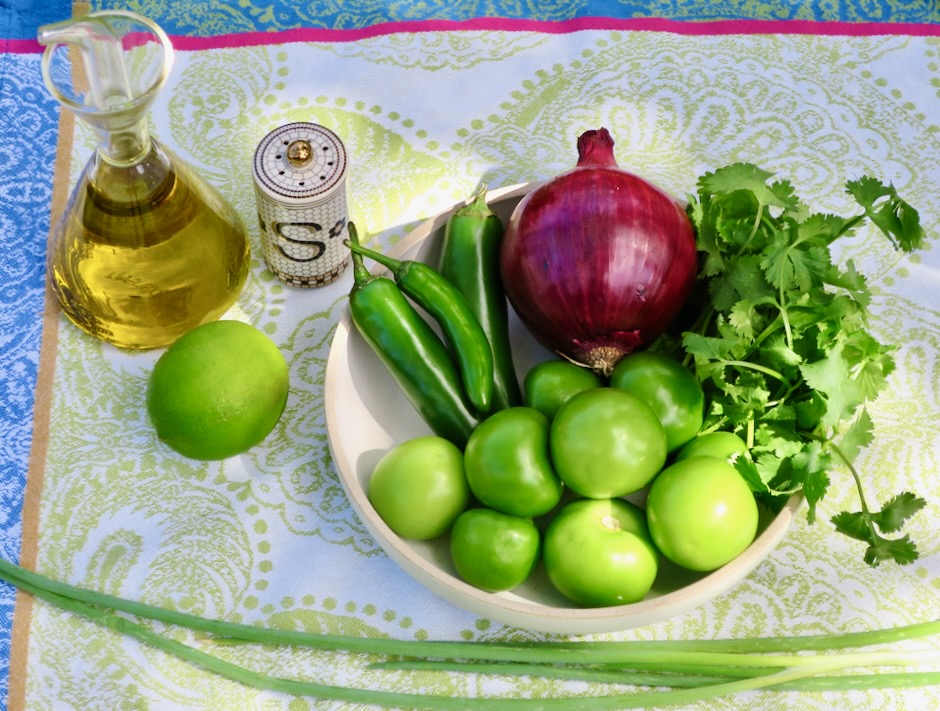
You can switch out the red onion for white, and use jalapeños instead of serranos.

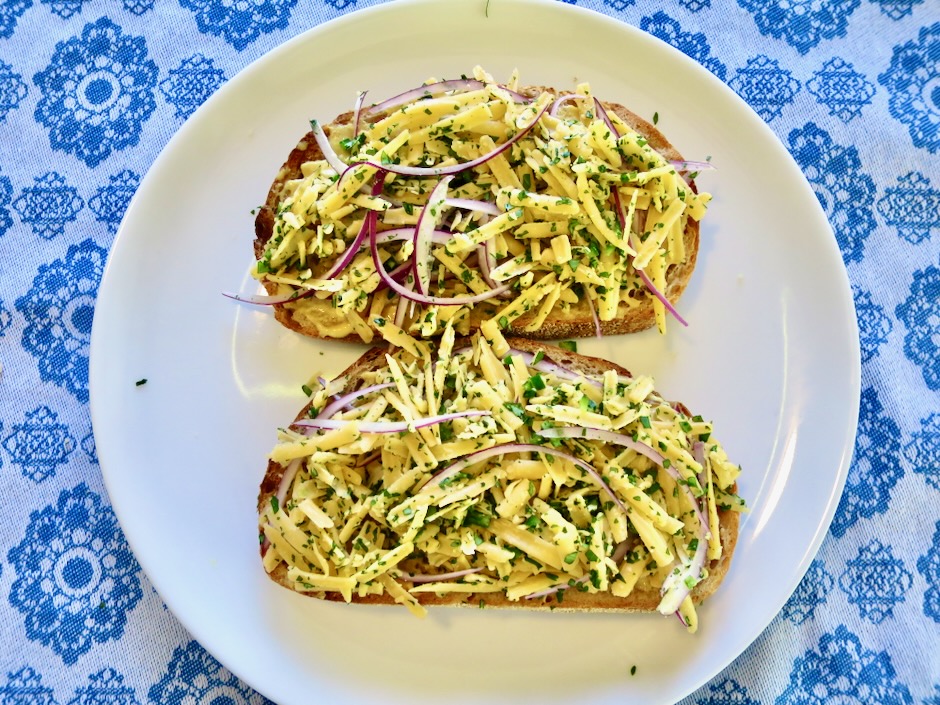
There are many versions of Eggs Kejriwal that exist today. Make it your own by using your favorite cheese (a good melting cheese) such as pepper jack. You can’t go wrong with sharp cheddar cheese which I used here.

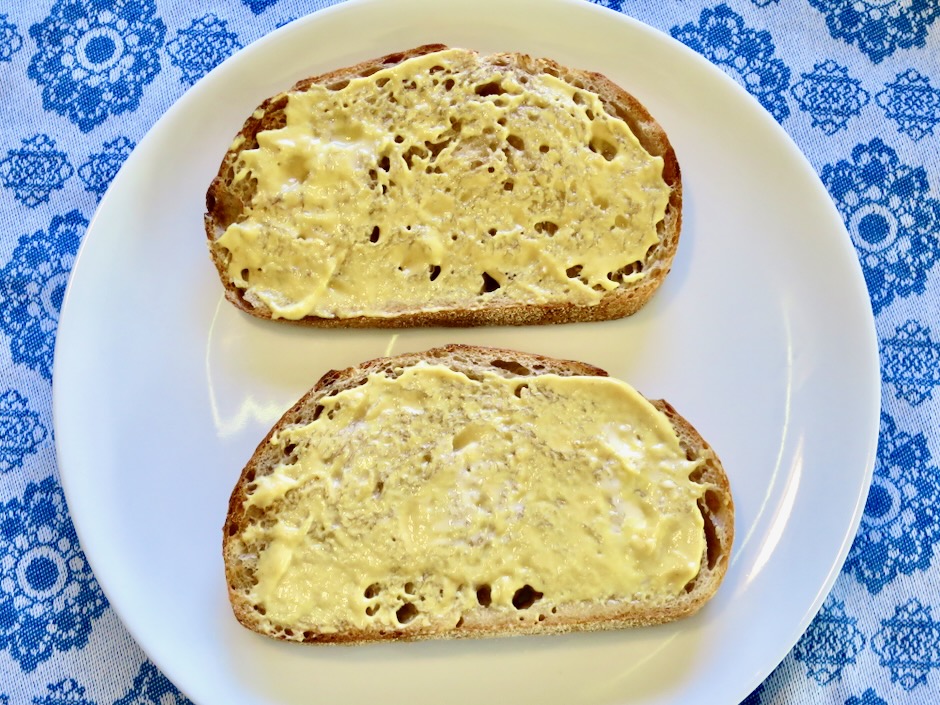
Some versions of this dish spread Dijon mustard over the toasted bread before layering on the other ingredients. Now that I’ve made this a few times, I wouldn’t have it any other way. The mustard adds a pleasant zing to the dish that’s most welcome with the rich melted cheese and fried egg.

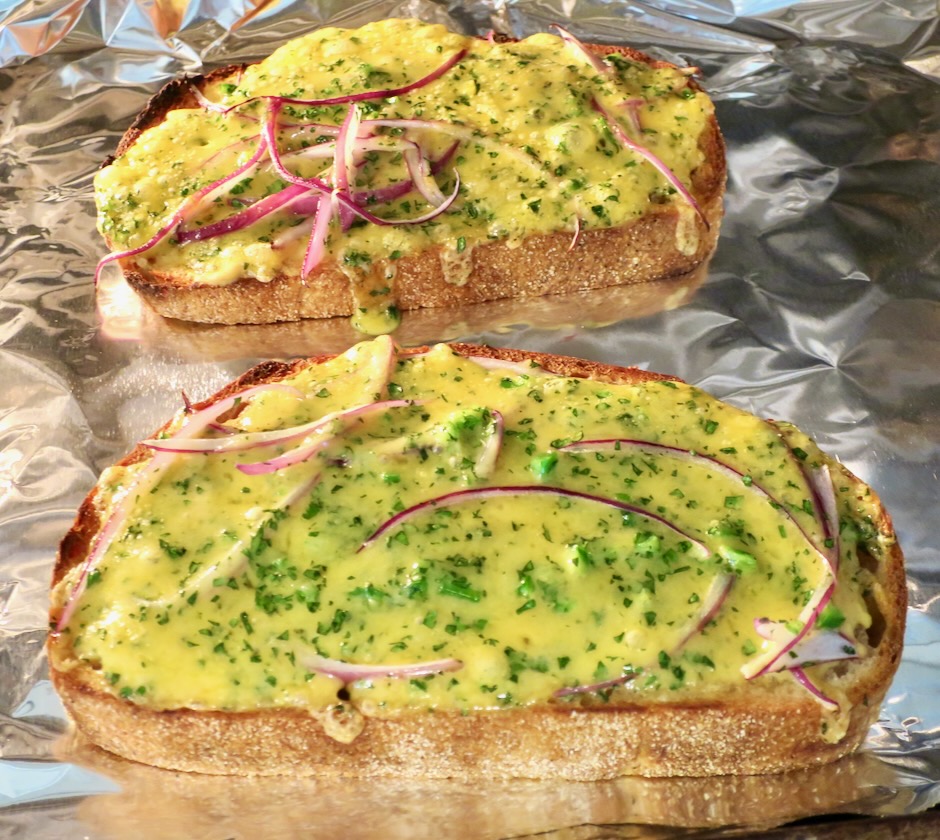
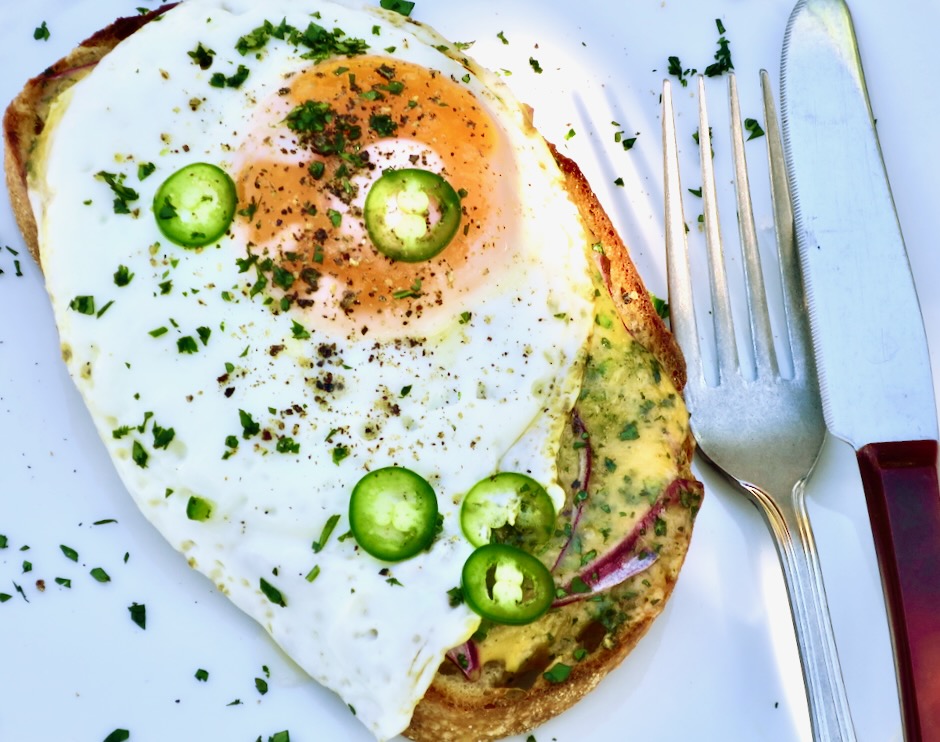
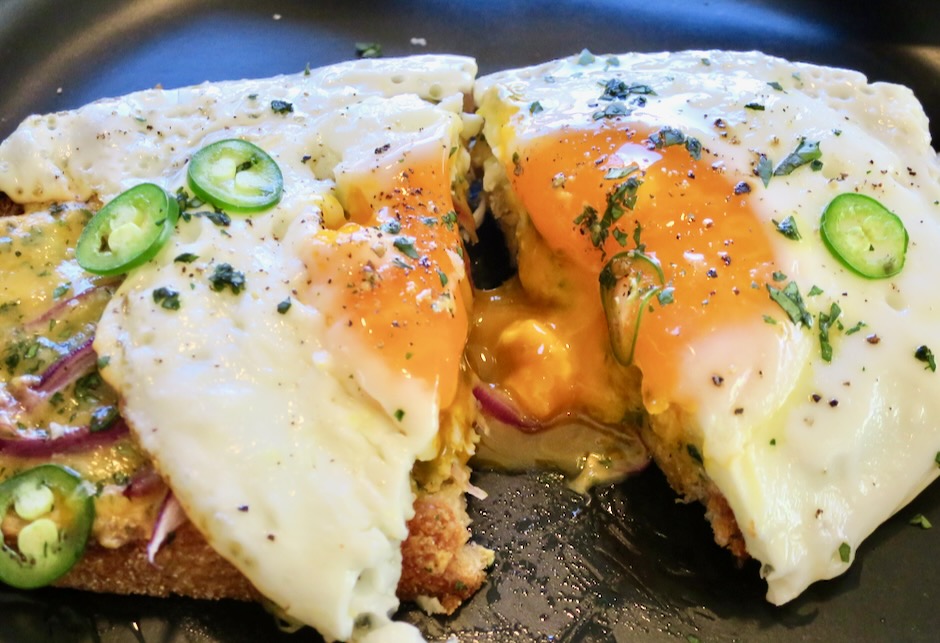
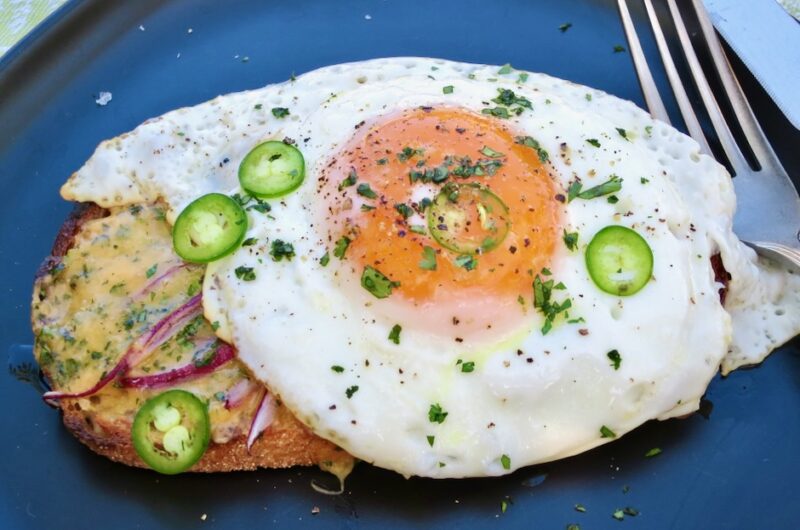
Ooooh! Melted cheddar with cilantro, serrano peppers and onions on toasted sourdough bread waiting for a perfectly fried egg.

I can’t think of a better breakfast or lunch than Eggs Kejriwal. It is spicy, cheesy and very comforting.

Cheesy Eggs Kejriwal

Recipe by Kiyo
Servings

2

servings

Adapted from Food & Wine magazine

Ingredients

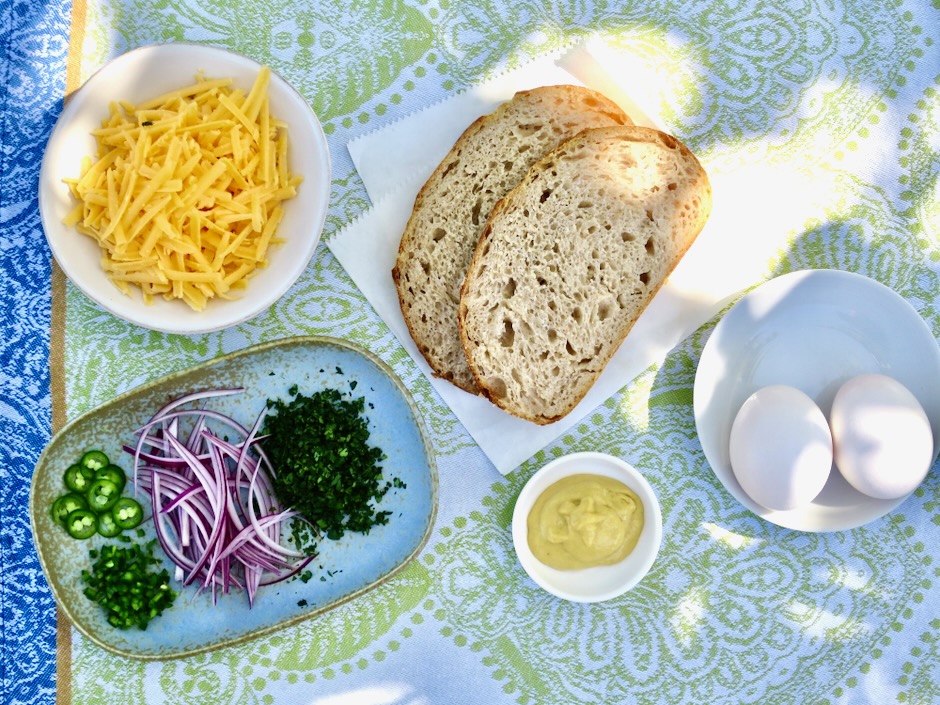
  • 2 slices sourdough bread or bread of your choice

  • 2 tablespoons butter, divided

  • 1 tablespoon Dijon mustard

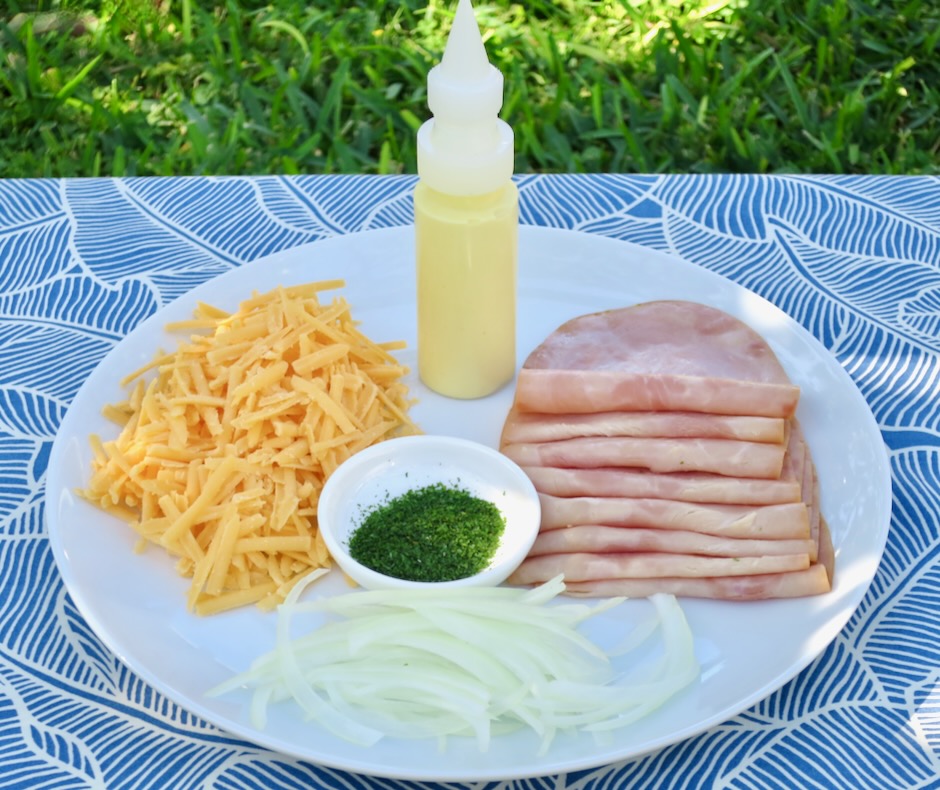
  • 1 cup (2 ounces or 57g) grated sharp cheddar or substitute with your favorite melty cheese

  • 1 serrano chile, finely chopped, plus a few slices for garnish (or jalapeño)

  • 2 tablespoons chopped cilantro, plus more for garnish

  • 1/4 cup (.05 ounces or 15g) red onion, thinly sliced

  • 2 large eggs

  • Kosher salt

  • Freshly ground black pepper

Directions

  • Toast the bread slices to a light golden brown and spread with 1 tablespoon of butter, or butter bread and brown in a skillet. Add mustard to one side of each bread. Combine cheese, chile, cilantro, and onion in a bowl and toss to blend. Divide cheese mixture between the bread slices and pile on top. Place bread on a baking sheet.
  • Turn toaster oven broiler to high (or heat oven broiler on high) with oven rack 6 inches from heat. Broil the cheese-topped bread until the cheese has melted, about 3 minutes, checking occasionally to avoid burning the toast.
  • Meanwhile, melt the remaining 1 tablespoon of butter in a medium nonstick skillet over medium heat. Crack eggs into skillet and sprinkle with kosher salt and black pepper. Cook eggs until the whites are firm and the yolks are runny, about 4 minutes, adjusting heat as needed. Top each piece of bread with the fried egg, reserved chiles and cilantro. Serve immediately.

Notes

  • Taste the chile to see how spicy it is before adding all of it to the cheese mixture. Chiles from markets can vary in heat. Use the amount that suits your taste.
Dinner, Lactose Free, Mexican, Recipes, Rice Dishes

Easy Salsa Rice

February 21, 2024

If you happen to have a bit of leftover salsa and are wondering how you might use it (other than finishing off those last corn chips in the bag), give this easy salsa rice recipe a try. It’s similar to my Sopa de Arroz recipe but saves time by incorporating prepared salsa. It is my favorite accompaniment to any Mexican meal.

If the salsa you are using is very chunky, give it a few pulses in a food processor or an immersion blender if you have one.

Any red salsa will work whether mild or spicy. Let your own taste be the guide.

It’s essential to rinse and dry the rice well. This quick step will remove excess starch which can make rice clumpy and overly sticky. You want fluffy, separate grains for this recipe.

Once the oil is hot, stir in the rice and continue stirring until the rice takes on a very light golden color.

The salsa is added to the rice and continuously stirred to coat each grain. Watch the bottom of the pan to avoid burning the salsa.

Finally, the broth, salt, and chile powder are added to the rice.

Left uncovered, the broth is absorbed by the rice until nearly gone. Small holes will appear on the surface of the rice. Now it’s time to put the lid on and cook the rice for 20 minutes. Absolutely no peeking. The lid must stay on for the duration of the cooking time as well as after the timer goes off.

The rice has rested in the covered pot for 20 minutes. Now it is ready to be fluffed and served.

The salsa rice is delicious in a burrito or served with your favorite Mexican dishes. Warm the rice up for breakfast with cheesy scrambled eggs and corn tortillas.

Easy Salsa Rice

Recipe by Kiyo
Servings

6

servings

Ingredients

  • 2 cups long grain rice

  • 1 tablespoon canola or vegetable oil

  • 1/2 cup + 1 tablespoon tomato salsa of your choice (if very chunky give it a few pulses in a food processor)

  • 3 cups chicken broth

  • 3/4 teaspoon kosher salt or 1/2 teaspoon fine sea salt

  • 1 teaspoon mild pure chile powder such as Hatch Mild Red Chile Powder from The Chile Shop online store) optional

Directions

  • Rinse rice in a sieve to remove excess starch. Drain very well, tapping the bottom of the sieve to remove any water collected on the bottom. Place the sieve on a clean kitchen towel to drain further while you heat your pan. This step is essential for giving your rice a fluffy texture and grains that remain separate.
  • Heat 1 tablespoon canola or vegetable oil in a large multi-purpose pot with lid or Dutch oven (wider bottom works better than narrow and tall pot) over medium-high heat. Once oil is hot, turn heat to medium and add drained rice. Coat rice with oil and stir constantly until rice takes on a very light golden color, about 5 minutes.
  • Turn heat down to low and add salsa. Stir continuously for a minute or two with a wooden spoon, coating the rice and scraping the bottom of the pan to avoid burning the salsa. Mix in 3 cups of chicken broth, salt and chile powder if using. Turn heat to medium-high and allow liquid to evaporate for about 6-7 minutes or until there is barely any liquid covering the rice and small holes appear on the surface of the rice. Turn heat to low and cover pot. Set your timer for 20 minutes. Do not open the lid while the rice is cooking.
  • Once the timer goes off, turn off the heat. Do not open the lid. Allow rice to sit, covered, for 20 minutes. Remove lid (be careful of the condensation on the inside of lid) and fluff rice with a fork before serving.

Notes

  • Leftover rices can be frozen for a few months.
Appetizers, Dinner, Lactose Free, Mexican, Recipes, Sauces, Summertime Meal, Vegan, Vegetarian

Tomatillo Salsa Cruda

February 14, 2024

This beautiful salsa is so refreshing and very easy to put together. It compliments a wide range of dishes: tacos, scrambled eggs, burritos, quesadillas, tortilla chips and grilled chicken. And since you do not need to cook any of the ingredients you can make this in a jiffy.

This recipe comes from Fermin Nunez, voted best new chef in 2021 by Food & Wine magazine. It caught my attention not only because I love Mexican cuisine, but also because it seemed easy to make. I knew it would be delicious served with tacos I planned for dinner. A little tart from the tomatillos and lime juice, a little spicy from the chiles, this salsa cruda (raw sauce) is delightful.

After a little chopping, everything goes into the food processor for a quick whirl. Lime juice, olive oil and salt are stirred in to balance the flavors. That’s it. The salsa is ready to be served.

Tomatillo based salsas go hand in hand with braised pork tacos and any style of tortilla chips.

Tomatillo Salsa Cruda

Recipe by Kiyo
Servings

8

servings

Adapted from Food & Wine magazine

Ingredients

  • 12 ounces (about 2 1/2 cups) fresh tomatillos, husked, washed and roughly chopped

  • 4 ounces (about 3/4 cup) red onion, roughly chopped

  • 1 cup packed fresh cilantro (from 1 medium bunch)

  • 2 ounces (2 medium) jalapeños, stemmed and roughly chopped

  • 1 ounce (2) scallions, trimmed and roughly chopped

  • 1/8 ounce (1 medium or 1 1/2 tablespoons) serrano chile, stemmed and roughly chopped

  • 2 tablespoons olive oil

  • 2 tablespoons fresh lime juice

  • 1 teaspoon kosher salt, plus more to taste

Directions

  • Pulse tomatillos, onion, cilantro, jalapeños, scallions, and serrano chile in a food processor until finely chopped, 12-16 pulses, stopping to scrape down sides of bowl as needed. Transfer mixture to a medium bowl. Stir in olive oil, lime juice, and salt. Season with additional salt to taste.

Notes

  • For a milder salsa, remove the pith from the chiles. Salsa will keep well for up to 3 days stored in the refrigerator.
Bread, Cheese, Dinner, Japanese, Recipes, Sandwiches

Japanese Ham Rolls

February 6, 2024

While watching YouTube cooking shows one afternoon, my husband and I came upon Japanese Cooking 101 by Noriko and Yuko. We were impressed by their many interesting recipes as well as the relative simplicity of the recipes. The one that instantly intrigued us was their ham roll. Apparently, most Japanese bakeries offer some version of this tasty roll. The rolls are pillowy, tender and just plain delicious. For a video of how to make the rolls, visit Japanese Cooking 101.

You can make the rolls with just ham, or add some cheese (grated or very thin slices) as we chose to do. Just be sure the ham and cheese are not too thick so you can roll them up easily. The topping of thinly sliced onions adds lots of flavor to each bite. Feel free to use a red or white onion. The finishing touches are a combination of Kewpie mayo and mustard which is drizzled over the top and dusted with aonori (dried green seaweed flakes) before the rolls are baked. We have also used a mixed dried herb dusting with good results as well as toasted sesame seeds.

Once the dough has risen it is divided into 8 pieces which are formed into balls. Cover the dough balls and let rest for 20 minutes before rolling out.

When rolling out the dough try to make a rectangular shape (about 4 1/2 by 7-inches) slightly larger than your ham slices. This makes it easier to roll the dough into an even shape.

Place some of the cheese (if using) on the rolled out dough followed by a slice of ham. If the ham is too large cut it to fit the dough. If too small, cut extra pieces to fill in the empty space. Keep the border of the dough free of ingredients.

Once the cheese and ham are layered on the dough, roll up from the short end and pinch the dough together to seal.

Next, bend the dough over and pinch the two edges together.

Push the dough down to flatten slightly.

With a sharp knife, make a vertical cut leaving 1-inch uncut at the side where the dough has been pinched together.

Gently open up the dough and lay cut side up on a parchment lined baking sheet. Continue with the remaining dough balls. Cover the baking sheet with a clean kitchen towel or the lid that sometimes comes with baking sheets. Let dough rise for about 45 minutes and up to 1 hour until doubled in size.

Once the dough has risen, brush an egg or egg white wash (we like to use dried egg white powder) over the rolls. Squeeze a bit of mayo-mustard mixture over the tops of the rolls. Scatter onions over the top along with aonori, dried herbs of your choice or sesame seeds. Bake for 12 minutes or until golden brown.

These ham rolls are spectacular just out of the oven. Eat them while they are still warm. In the rare case you have leftovers, freeze them for that rainy day when you’re craving a satisfying snack.

Japanese Ham Rolls

Recipe by Kiyo
Servings

8

servings

Special equipment: Stand mixer
Recipe adapted from Japanese Cooking 101

Ingredients

  • Japanese Basic Bread Dough
  • 2 cups (240g) bread flour

  • 1/2 cup (60g) cake flour

  • 1 2/3 teaspoons (5g) instant yeast

  • 2 tablespoons + 1 teaspoon (30g) granulated sugar

  • 1 teaspoon (5g) fine sea salt

  • 1 tablespoon (10g) dried milk powder

  • 3/4 cup + 1 tablespoon (200g) warm whole milk (100-110 degrees)

  • 2 tablespoons (30g) butter, room temperature and cut into small pieces

  • Ham Rolls
  • 1 recipe bread dough above

  • 8 thin slices cheddar cheese or grated cheddar cheese

  • 8 thin slices ham

  • Egg wash: 1 egg + pinch of salt mixed well, or egg white powder mixed according to package directions

  • Kewpie mayonnaise mixed with mustard

  • Thinly sliced red or white onion

  • Aonori, dried mixed herbs or toasted sesame seeds

Directions

  • Combine bread flour, cake flour, yeast, sugar, salt and milk powder in the bowl of a stand mixer. Whisk to combine. Add milk and start the mixer with the dough hook on medium speed. When dough begins to form a ball after about 8 minutes, add the softened butter, increasing speed to medium-high. Continue to mix for another 4-5 minutes until the butter is completely incorporated scraping down sides of bowl if necessary. Transfer dough to a lightly oiled bowl and cover with plastic wrap or lid. Leave in a warm place for about 1 hour until the dough has doubled in size.
  • Deflate dough and remove from the bowl to a clean work surface. Divide the dough into 8 equal pieces, about 70g each. Form into small balls (dusting work surface with flour if sticking). Place on a parchment or Silpat lined sheet pan. Cover and let rest for about 20 minutes.
  • Roll out dough into a rectangular shape about 4 1/2×7-inches. Place cheese (if using) on dough followed by a slice of ham leaving the border free of ingredients. Roll from the short edge of the dough tightly like a jelly roll and pinch the seam together. Place the dough on a cutting board and pinch the ends of the roll together. Push dough down to make somewhat flat. Make a vertical cut leaving 1-inch uncut at the side where the dough has been pinched together. Gently open the dough and place on baking pan lined with parchment paper swirl side up. Repeat with the rest of the dough balls. You should be able to fit 8 rolls on one half sheet pan leaving space between the rolls (see photo above). Cover with a clean kitchen towel or sheet pan lid and let rise for 1 hour or until doubled in size.
  • While dough is rising, preheat oven to 400 degrees.
  • After the rolls have doubled in size, brush egg wash over the rolls. Squeeze mayo-mustard mixture on top, add a few pieces of sliced onion and sprinkle with aonori, or dried herb mixture of your choice and/or toasted sesame seeds. Bake for 12 minutes or until browned.

Notes

  • The entire process takes approximately 3 to 3 1/2 hours from start to finish. Make the dough in the morning and you’ll have the most delicious meal ready at lunchtime.
Appetizers, Breakfast, Cheese, Dinner, Recipes, Side Dishes, Summertime Meal, Vegetarian, Veggies

Easy One-Bowl Corn Fritters

January 30, 2024

These easy one-bowl corn fritters are quick to make with simple pantry staples. Pan-fried until golden brown and crispy, the fritters pair nicely with many other dishes. Serve them as an appetizer or a side-dish at your next barbecue, and for breakfast with fried eggs and bacon.

For best results use fresh sweet corn. Frozen or canned corn will make an acceptable substitution as fresh corn is not always in season. Be sure to drain the corn well before adding it to the batter.

I have made the corn fritters with all flour and half flour and half cornmeal. As a whole grain, cornmeal adds a little extra nutritional value. If you have it, go ahead and use it. Otherwise using all flour is perfectly fine.

The batter is easy to work with. Drop spoonfuls into your frying pan and let the fritters cook until browned on both sides. They are best eaten immediately while they retain their crispy texture.

On most occasions I serve the fritters with a dollop of sour cream and a sprinkle of smoked paprika along with a crispy salad to complete the meal. I’ve had success freezing leftovers in a plastic container and reheating them in a pan with a bit of oil. They are the perfect snack for those lazy days when we don’t have the energy to cook and clean up the kitchen.

Corn Fritters

Recipe by Kiyo
Servings

4

servings

Adapted from NYT Cooking – Makes 16 fritters

Ingredients

  • 2 large eggs

  • 2/3 cup (162g) lactose free whole milk, or regular whole milk

  • 1 teaspoon fine sea salt

  • 1/2 teaspoon garlic powder

  • 1/2 teaspoon freshly ground black pepper

  • 1/4 teaspoon ground cayenne (or up to 1/2 teaspoon)

  • 1/2 cup (60g) all-purpose flour (use 1 cup, 120g of flour if not using cornmeal)

  • 1/2 cup (75g) cornmeal, such as Bob’s Red Mill medium grind

  • 2 teaspoons baking powder

  • 3 cups (430g) fresh corn kernels (can substitute with frozen corn thawed and patted dry or canned, drained)

  • 1/4 cup chopped green onions

  • 1 cup (114g) sharp cheddar cheese, shredded

  • vegetable or canola oil for frying

Directions

  • In a large bowl, whisk together the eggs, milk, salt, garlic powder, black pepper, and cayenne pepper. Stir in the flour, corn meal if using and baking powder just until combined. Stir in the corn, green onions and cheddar cheese.
  • Heat a non-stick skillet over medium heat with enough oil to generous cover the bottom of the pan. You may use a cast iron skillet if you have one (heat over medium-low).
  • Once the oil is shimmering hot, add heaping tablespoons of batter to the pan. Use the back of a spoon to flatten into a round patties (do not crowd pan). Fry for 2 minutes then flip and fry for another 2 minutes then cook for an additional 2 minutes adding more oil as needed.
  • Remove fritters to a paper towel-lined baking sheet. Repeat until all fritters are fried. Serve with a dollop of sour cream and a sprinkle of smoked paprika.

Notes

  • Leftover fritters can be frozen in a plastic freezer container. Thaw and reheat in a skillet with a bit of oil over medium-low heat to warm and crisp up.
Dinner, Italian, Lactose Free, Pasta, Recipes, Salad, Side Dishes, Summertime Meal, Vegan, Vegetarian

Broken Pasta Salad

January 20, 2024

I fell in love with this salad immediately. Not only is it a gorgeous salad to bring to the table, the flavors and different textures are superb. The addition of maple syrup in the dressing adds the perfect touch of sweetness that pairs so well with the intense flavors of bitter radicchio and briny, salty olives.

The original recipe from Bon Appetit calls for broken lasagna noodles. I used ribbon shaped mafaldine pasta instead because it is what I had available. Similar to lasagna with its ruffled edges, mafaldine is a very versatile pasta to have on hand.

Castelvetrano olives are a favorite of mine. Here on Maui they can be tricky to find. Sadly, Whole Foods does not sell them at their olive bar any longer though they are available packaged. You could substitute Picholine olives if you can’t find Castelvetranos.

The salad dressing is delightfully sweet and tart thanks to the maple syrup, red wine vinegar and fresh lemon juice. A bit of nutritional yeast adds flavor and body to the dressing.

If you have any leftover salad, it can be stored in the refrigerator and eaten the next day. If possible, reserve some of the toasted almonds to sprinkle on just before serving so they retain their crunchy texture.

Broken Pasta Salad

Recipe by Kiyo
Servings

4-6

servings

Adapted from Bon Appetit magazine

Ingredients

  • 2/3 cups raw almonds

  • 1 pound mafaldine or wavy lasagna noodles, broken into 2-inch pieces

  • kosher salt

  • 1 large garlic clove, finely grated

  • 1/2 cup extra-virgin olive oil

  • 1/2 cup finely chopped parsley

  • 1/3 cup finely chopped basil

  • 1/4 cup fresh lemon juice (2 lemons)

  • 1/4 cup red wine vinegar

  • 2 tablespoons nutritional yeast

  • 1 1/2 tablespoons pure maple syrup

  • pinch of crushed red pepper flakes

  • freshly ground pepper

  • 1 small head radicchio, thinly sliced

  • 2 cups Castelvetrano olives, pitted and torn (can substitute with Picholine or other green olives)

Directions

  • Preheat toaster oven or oven to 400 degrees. Toast almonds on a rimmed baking sheet, tossing halfway through, until fragrant and slightly darkened, 6-9 minutes. Let cool slightly, then finely chop.
  • Meanwhile, cook noodles in a large pot of boiling salted water, stirring occasionally, until tender (you don’t want al dente pasta salad). Drain and rinse under cool water.
  • Stir almonds, garlic, oil, parsley, basil, lemon juice, vinegar, nutritional yeast, maple syrup, and red pepper flakes in a large bowl. Season dressing generously with salt and black pepper.
  • Add noodles, radicchio, and olives to dressing and toss to combine. Serve with crusty sourdough bread.
Follow

Get every new post delivered to your Inbox

Join other followers: